November 18, 2017 : Bulma And Her Relevance
There was some sad news reported this week – the Japanese voice actor who portrayed Bulma passed away. I never knew of her (although it looks like she had quite the career, including Meryl Stryfe from Trigun); and this doesn’t really impact the version of DBZ that I watch, but it’s still a bummer nonetheless.
The news actually got me thinking of the character of Bulma, and her role in the Dragon Ball franchise. Nowadays, she’s relegated to comic relief or Filler Material (and has been for quite some time). However, she did play a much more important role when Dragon Ball first started. She was the connecting character that framed Goku’s unbelievable skills, helping enfold the world of Dragon Ball.
She became less relevant when the tournament Sagas began. As DBZ moved on, she stayed around to help advance the story through her technological prowess (allowing for space travel and quick Dragon Ball hunting). Her knowledge of Dr. Gero sped along the faster moving plot of the Android and Cell Saga. However after that, she remained on the show mostly to be an incubator for half Saiyans. Although one could argue she also acts as an anchor for Vegeta.
Overall, Dragon Ball does a good job of ‘discarding’ obsolete characters. They will do an occasional call back for nostalgia sake, but they don’t let them bog things down. Bulma seems to be the exception. She seems to still sticks around, probably for the reasons mentioned above.
It’s easy to dismiss Bulma. She doesn’t have any powers, which is what DBZ became and the focus of Dragon Ball Super – and we had to endure her dealings with Frog Captain Ginyu (insert shudder here). However, the more I think about it, Bulma is the strongest female character in the franchise. She might be annoying at times, but you can also say that about what Gohan has became after the Cell Saga.
So for that, I think I have a new found respect for Bulma. She was (and still is… sorta) an important character. More so than Krillin. Although, every time he dies, it angers a Saiyan – and the aftermath of that is pretty cool to watch.
posted by Pi Visuals at 11:40 pm
Tags: DBZ , Dragonball , RandomComment
October 28, 2017 : So The Matrix Code Was Supposed To Make Me Hungry?
Things have been busy and so it’s been a while since I’ve made a post. While I don’t have much substance to share at the moment, I’ll link to this article – which describes the inspiration for the design of the Matrix Code. As you’d expect, it was a mash up of… sushi recipes?
The article is pretty interesting. However, the part that really caught my attention was the latter half, which talked about new movies currently in pre-production. It technically isn’t considered a Reboot (thankfully), nor is the new material sequels. Instead, it is just expanding the universe. Color me intrigued.
posted by Pi Visuals at 12:43 am
Tags: The MatrixComment
October 8, 2017 : Dragon Soul Piano Cover – Making Of
Making the Dragon Soul Piano Cover video was fun, but it did come with its challenges. Most of this came after shooting the video.
Some preliminary work was needed prior to shooting (outside of making the costumes, of course). The biggest was determining the best location for the mic. After some testing, the answer was on the book shelf, to the right of the screen behind a few books.
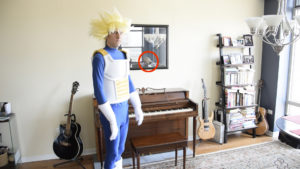
The other thing was setting up the shot. However, I wish I was more thorough with this. While I like the camera angle, I should have removed the mirror. The reason:
I should have realized the mirror was going to cause problems; and while I could have left things as is, I felt the presence of this Photo Bomber was too distracting.
On the bright side, I used this distraction (let’s call her Mary) as an excuse to do some masking/ rotoscoping. While tedious, it’s still a worthwhile skill to keep sharpened.
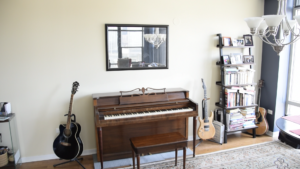
The first step in removing Mary from the video was creating a Mary-Free image in Photoshop. This was done rather easily with the Clone Stamp Tool:
The next step was removing Mary frame by frame. This required the use of masks in After Effects, and keyframing their position whenever somebody walked in front of Mary. This was admittedly a bit of a time suck: but after a decent amount of effort, I was happy with the final product:
Fortunately, once Piccolo came in the shot, he obscured our unwitting Photo Bomber. As such, I didn’t have to do this for the entire 90 seconds. It was closer to about 40 seconds.
There were a few other steps that had to be done. These included:
   • Reviewing The Takes: Playing piano in those gloves was not easy. It took several attempts before I got a satisfactory take. I believe out of 7 tries, there were only two takes where I didn’t cut early due to mishaps. Since the camera kept rolling throughout, I had to review and document where these were.
   • Audio Editing/ Mixing: Even though a good location for the mic was determined prior to shooting, I still took the audio into Audition and did a little mixing to boost the overall sound quality. As always with mixing, I could have spent even longer on it, but I had to know when to say when.
   • Add SFX: It was subtle, but I wanted to enhance the video with a few subtle sound effects. The most obvious was the ‘Whoosh’ around 0:04, but the footsteps and squeaking sound when I sat on the piano bench were also added after the fact. The other big thing was adding a ‘Room Tone’. This subtle background noise was present when the piano wasn’t playing and helped the transition between silence and music.
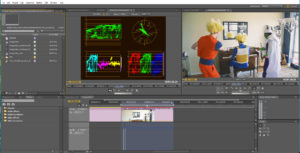
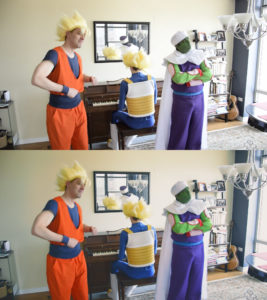
   • Color Correction: I have not had much experience with Color Correction, and this was a perfect time to get more acquainted. Ideally, I wanted to give Adobe Premiere’s Lumetri Scopes a whirl. Unfortunately, that wasn’t an option this time around. Instead, I used some basic Contrast, Brightness, and Fast Color Correction settings to boost things up. I also got a better handle on the Waveforms and Scopes that detail the video’s color palette.
The adjustments were more subtle, but I used it more as a learning exercise while still tweaking things. Quickly: I lowered the brightness, increased the contrast, added some red/ orange to the highlights and midtones, and gave a slightly redish tint to the shadows. In the image below, the image on top is the original, while the bottom image is the color correction:
I normally do editing for animation projects in Sony Vegas, however I wanted to stretch myself a bit and use Adobe Premiere – something I have only a little experience with. I feel it provides more control with color correction, even without the Lumetri Scopes. Fortunately I was familiar enough with the software that it wasn’t much of a learning curve.
Overall, I am very happy with the end result for the video. The material is definitely esoteric, but I love it. Specifically, the dancing cracks me up as well as the interchange between Goku and Piccolo. Plus, I love the song (both playing it and listening to it).
The project provided a lot of fun exercises and yielded a video I thoroughly enjoy. Hope you agree – and found this post informative.
posted by Pi Visuals at 1:47 am
Tags: After Effects , C2E2 , DBZ , Dragon SoulComment
October 6, 2017 : SyFy Says, “Goodbye Dark Matter, Hello Futurama”
The news is about a month old, but SyFy cancelled Dark Matter. Season 3 is waiting to be watched on my DVR Queue, but I was a fan of the show. I will still view it – after I finish up a few other older shows – but now it will be bittersweet. Dark Matter was intended to be a 5 season series, and so it clearly will leave stories left untold and questions unanswered.
In better news (or should I say “Good News, Everyone”), SyFy purchased the rights to Futurama and will begin airing episodes in November. It sounds like the deal is for multiple years; and while it has a hefty price tag, it isn’t exclusive. That said, it will be nice to see Futurama back on TV while flipping through the old Boob Tube. I just hope they don’t do the awful editing that Comedy Central did when it ran them.
posted by Pi Visuals at 2:02 pm
Tags: Cancelled , FuturamaComment
September 29, 2017 : Dragon Soul Piano Cover (in Cosplay)
This Spring not only did I make my usual trek to C2E2, but I also spent a day doing some Cosplaying for the first time (the previous Halloween actually served as a trial run for the costumes).
In addition to enjoying the experience (the costumes were very well received), I also shot a short video that mashed my love of the DBZ theme song, Dragon Soul, with our Cosplay theme. I finally got around to uploading it:
I hope to make another post in the next week that details the efforts put into making this video. I didn’t just record it and throw it online. Multiple steps were taken after the fact to improve the quality as well as address issues that arose.
In the meantime, enjoy the silliness!
posted by Pi Visuals at 11:05 am
Tags: C2E2 , DBZ , Dragon Soul , Halloween , PianoComment
September 14, 2017 : Netflix Getting Into The Anime Game
I’m liking Netflix more and more these days. I’ve already enjoyed some of their anime (Rerouni Kenshin and Hunter X Hunter), but they recently announced first-run streaming of twelve anime series as well as one feature.
Obviously Netflix is trying to get more viewership and appealing to a broader audience base is a wise tactic. I doubt they will ever rival the likes of Crunchyroll or Funimation; but seeing as how I already have an account (one admittedly I don’t use as much as I should), it’s nice to know they could be getting more material that directly interests me.
The content is expected to be available in 2018, which will hopefully give me enough time to clear out my DVR (or at least decidedly give up on shows and delete them once and for all… I’m looking at you Tokyo Ghoul and Attack On Titan).
posted by Pi Visuals at 2:59 am
Tags: AnimeComment
August 27, 2017 : New FLCL Teaser Trailer
A few weeks back, a teaser came out for the new seasons of FLCL. It isn’t long, and much like the original show, it is fast paced and tough to decipher on first watch; but it was still great:
The best part of the teaser for me? Without a doubt hearing The Pillows.
The 12-episode revival will get split into two six episode seasons – the first debuting next year (although not sure when in 2018). Below is Adult Swim’s earlier release describing what to expect:
Meanwhile, the war between the two entities known as Medical Mechanica and Fraternity rages across the galaxy. Enter Hidomi, a young teenaged girl who believes there is nothing amazing to expect from her average life, until one day when a new teacher named Haruko arrives at her school. Soon enough, Medical Mechanica is attacking her town and Hidomi discovers a secret within her that could save everyone, a secret that only Haruko can unlock.
But why did Haruko return to Earth?
What happened to her Rickenbacker 4001 she left with Naota?
And where did the human-type robot ‘Canti’ go?
I can’t think of an anime I’m more stoked is coming back with new episodes. Bebop is my favorite anime, but they need to leave well enough alone with that series – it ended masterfully. With FLCL, the door was left open for more. Who thought it would take nearly two decades to finally do something about it?
posted by Pi Visuals at 10:02 am
Tags: Cowboy Bebop , FLCLComment
August 12, 2017 : J.G. Quintel’s Regular Show Follow Up
Full disclosure: I haven’t finished watching Regular Show. While that should happen soon, I admit I am a little behind on the times. Although, there are much older shows on my DVR Queue that also waiting for my time (and possibly interest).
In either case, I have liked Regular Show since it premiered. So I was intrigued when I heard creator J.G. Quintel has a new series on TBS this Fall. Below is a Sneak Peak, which I found funny:
This is clearly geared toward adults, but Quintel’s brand of humor and visual style still resonated. Reading up about the show, which is slated to premiere in either late 2017 or early 2018, I found out TBS has several adult oriented animation series coming out that will accompany American Dad. Not sure how they will all fare, but it’s nice to see TBS getting in on the Animation Fun.
posted by Pi Visuals at 4:32 pm
Tags: Regular ShowComment
August 4, 2017 : Rig Improvements – Head/ Face Edges (Part 3)
In the previous two parts, I discussed how and why I made significant changes to the Head/ Face of my characters’ rigs. For the last part in this series, I want to detail the controls of the head during animation.
The changes to the Head/ Face area were made to control the Edge Lines, particularly around the chin and jawline. The other driving factor was to keep the orientation of the Head stationary while the rest of the body moved – a style more typical with 2D animation.
The end result was using two Target Nulls, effectively controlling all three rotational axis of the Head Bone. For the rest of this post, the Heading, Pitch, and Bank axis are Red, Green, and Blue respectively.
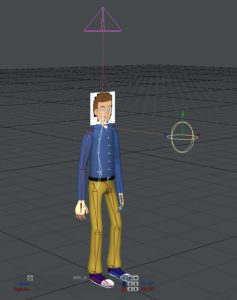
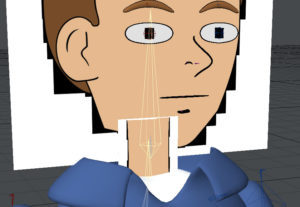
One null controlled the Heading and Pitch of the Head bone, while the other null controlled the Bank of the Neck bone – the parent bone of the Head bone – located just below it. Below is a shot with both bones selected (in Yellow):
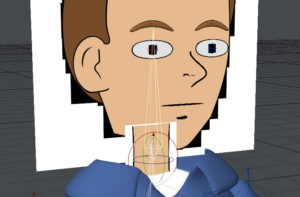
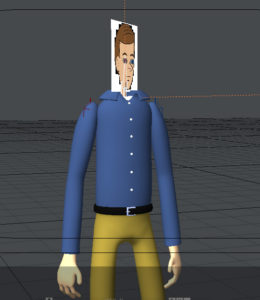
Since the head was an image projection onto a plane, I needed to have it constantly face the camera. Otherwise, the perspective of the face would look off:
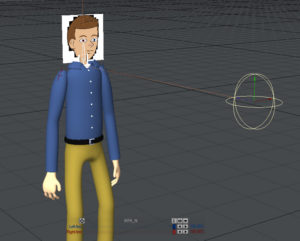
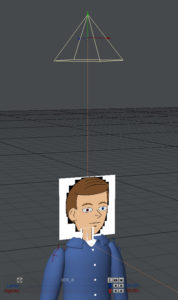
The first Target Null took care of this issue. The Neck bone’s Bank was oriented so that it pointed at this null. In many software packages, this is referred to as a Pole Vector. When the Neck bone rotates along the Bank to face the Target null, so does the Head bone. I typically left this null at the position of the camera and probably could have parented it to the camera, but for extra flexibility I adjusted it manually.
To ensure the head remained in the same relative vertical angle, the second Target Null was employed. The Head bone would rotate along its Heading and Pitch axis so that it pointed to this null. Without this setup, the Head would move in conjunction with the Spine. For action shots, this would probably be satisfactory but not for scenes focused more on dialogue or less drastic movements.
While the Target Nulls controlled the rotation of the Head bone, the bone itself still had the capability of moving positionally. I would do this in very small increments, typically along the y-axis, and it gave the animation a little extra kick.
Overall, I really liked the new rig. Aesthetically it achieved what I wanted – the Edge Lines and Head positioning stayed more consistent. This prevented extra time being spent in After Effects backtracking and trying to fix issues with the 3D Render.
That said, there were limitations. Specifically, the angles of the head (and thus the camera shots) were not very robust. Still, I felt for this project, the pros greatly outweighed the cons. Improvements can always be made – particularly from an automation standpoint – and I hope I can pursue these changes on future projects.
posted by Pi Visuals at 11:52 pm
Tags: Ad Wizards , LightwaveComment
July 22, 2017 : Happy Pi Approximation Day!
Happy Pi Approximation Day, nerds! It may not be the real deal, but I like it nearly as much (get it?).
Apparently, some mathematicians and physicists in recent years have argued to replace Pi with tau, which is the ratio of circumference to the radius and thus twice the value of Pi. The ridiculousness continues in that Pi Day would get replaced with Tau Day, taking place June 28th. Madness.
posted by Pi Visuals at 12:07 am
Tags: PiComment
